Big news (at least to me): My Peach-Prosciutto Crostini post is the Post of the Day on Food 4um! Many thanks to JoAnn for her support. Now, back to our regularly scheduled program….
My suitcase is finally stashed away, after residing on our bedroom floor for two weeks now.
There are no travel plans in my future or in the recent past. I store my off-season clothes in my suitcase, you see. A few weeks ago, I resigned myself to the end of summer, and dragged out the suitcase for the big switch.
The next day, Indian summer arrived with a vengeance. We had a week of balmy weather. I was delighted with this unexpected gift, but it I could neither pack up the shorts and tanks nor pull out the sweaters and cords.
Reality intervened, of course. The cool weather has taken up permanent residence. The tanks and shorts are tucked away. We’re into soup-stew-comfort food season. It’s also cool enough that heating up the oven is a good thing.
I’d been hearing a lot about long-rise, no-knead bread. The most famous recipe, by Jim Lahey of Sullivan Street Bakery in New York, is by all accounts sublime, but it must be baked in a cast-iron Dutch oven. I don’t have a cast-iron Dutch oven (yet; Christmas and my birthday are both coming up. Husband of mine, did you catch the hint?).
Jeff Hertzberg’s Simple Crusty Bread skips the special baking vessel, and has another advantage: you can make a large batch of the dough and leave it in the fridge for up to two weeks.
The first time I made this, I didn’t want to have a massive mound of dough taking over my fridge, just in case it didn’t work. I made just a third of the recipe, with 1 1/2 cups bread flour and just over 1/2 cup whole wheat flour. I made the dough just after dinner, put it in the fridge after two hours, and baked the bread the next afternoon.
The bread had good flavor and a lovely, crisp crust, but the loaf was oddly misshapen. In retrospect, I didn’t mix the flour into the liquid quite well enough, resulting in an uneven distribution of yeast.
The second time, I mixed up half the original recipe, still with some wheat flour. I let it rise for just over two hours, then left it in the fridge for a full day before making a loaf. Moist crumb, crunchy crust, and just the right amount of yeasty flavor. Like all good, fresh bread, it was best on the first day, and not bad on the second. One of the big benefits to this recipe is the ability to make a large amount of dough at once, then bake a small loaf whenever you need one.
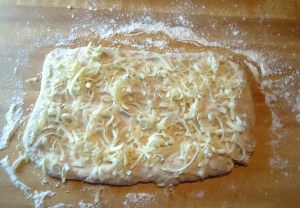
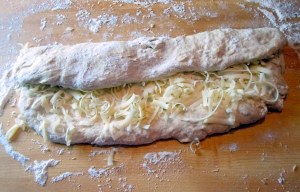
For the next batch, I pulled out a chunk of dough about the size of a very large grapefruit. On a heavily floured countertop, I flattened the dough into a rectangle, sprinkled a little grated cheddar over the bread, then folded the dough into thirds, like a letter.
I flattened the dough again, not quite as thinly. I added another quarter-cup of cheese, folded the dough in half, and moved it to a cornmeal-dusted cookie sheet. I sprinkled a bit more cheddar on the top and let it rise for a half hour before baking.
The cheese melds with the bread, creating a spiral of chewy cheddar goodness. Cornmeal adds a pleasantly gritty crunch. This bread was the perfect side to bowls of Tom’s chili. I wanted some for the pulled pork we’re having for dinner, but we ate the entire loaf at lunch.
No-Knead Cheddar Bread
Adapted from Jeff Hertzberg’s recipe
1 small loaf (with extra dough for 2-3 more loaves)
3 cups lukewarm water (a bit warmer than body temperature)
1 1/2 tbs. granulated instant yeast
1 tbs. salt (add another teaspoon if you’re not using cheese)
5 cups bread flour (or unbleached AP flour)
1 1/2 cups whole wheat flour (or just use 6 1/2 cups bread flour)
1 cup grated sharp cheddar (I used white cheddar; any favorite hard cheese will work)
Pour the water into a bowl or lidded container large enough to hold at least twice the quantity of finished dough (about 3 quarts). Sprinkle the yeast over the dough and stir to combine. Stir in the salt, then add the flour. Stir with a wooden spoon until the flour is evenly moistened and you have a shaggy, moist dough. This should only take a minute or two.
Cover the container lightly; I used a large plastic container and set the lid lightly on top. You can also cover the container with plastic wrap and punch a small hole in the center. The idea is to leave a space for gases to escape as the yeast grows and the dough rises.
Set the container aside in a warm place for at least 2 hours. You want the dough to double in size and start to collapse a bit. Put the container in the refrigerator, still lightly covered.
You can bake the dough any time; the dough will last for two weeks in the fridge, and will improve in flavor the longer you leave it.
When you’re ready for some bread, decide how you want to bake it. If you have a baking stone, place it on the center rack of a cold oven. Lay your wooden pizza peel on the counter and sprinkle generously with cornmeal. If you’re using a cookie sheet, line it with parchment paper and sprinkle with cornmeal. You can place a baking pan on the bottom rack of the oven if you wish; you’ll be pouring some water in it to create steam. I just toss a handful of ice cubes into the oven instead. (Not yet, though.)
Take the container out of the fridge and uncover it. Sprinkle the top of the dough lightly with flour. Use a sharp serrated knife to cut a chunk of dough; a piece the size of a large grapefruit will make a small loaf that will feed four hungry people.
To make a plain loaf of bread, flour your hands well and form the dough into a ball, stretching and smoothing the top surface of the dough and tucking the rough ends underneath. Place the ball, rough side down, onto your prepared baking surface. Let the dough rise for about 30 minutes.
To make a cheese loaf, place your hunk of dough on a well-floured countertop and flatten it with your fingers to a rectangle less than an inch thick. Evenly distribute half the cheese over the dough. Fold one long side a third of the way down, then fold again, as if you were folding a letter. Flatten the dough again, but not quite as thinly as before. Sprinkle on half the remaining cheddar. Fold the dough in half, and pinch the edges together to enclose the cheese. Transfer to your baking surface and gently form into a long log. Sprinkle the rest of the cheese on the top, and add a light dusting of cornmeal if you wish. Let the dough rise for 30 minutes.
Heat the oven to 450 degrees F. After the bread has risen for 50-60 minutes total, slash the top of the loaf 3 or 4 times with a sharp knife (this helps the dough in its final rise in the oven). Place the dough in the oven, add a cup of water to the baking pan on the bottom rack (or toss a handful of ice cubes into the bottom of the oven), and quickly shut the oven door. Bake for 30 to 45 minutes (depending on the size and shape of the loaf), until the crust is toasty brown and the bread sounds hollow when you tap the bottom of the loaf. You can also insert an instant-read thermometer; the dough should be about 220 degrees F.
Set the loaf on a rack to cool a bit before you dive in.


I’ve been doing the quick breads for a while. I love having the container of dough in the fridge to use for bread and pizza. Now I’m going to try this. It’s such a mouth-watering idea! It might make my family like soup.
Daisy, I haven’t used it for pizza dough yet, but will soon. I like being able to have a small loaf that can be eaten in a day or two.
You guys don’t like soup? How is that possible?
Pingback: Classic chicken noodle soup | Rivertree kitchen
What is the advantage to using bread flour as opposed to all purpose? Peg
Peg, bread flour is higher in gluten, which helps the bread to rise and develop that chewy texture and lovely crust. You certainly can make this bread with all-purpose flour and it’ll still be tasty.